[FAQ - BOL] How to publish unique products to bol.com
In this article, we’ll walk you through how to publish unique products to bol.com—these are products with EAN codes that currently have no existing content on bol.com.
With the latest version of our bol.com plugin, you can now upload these unique products directly from your WooCommerce store.
What Are Unique Products?
Unique products are items with EAN codes that don’t yet exist in bol.com’s catalog. Since you’re the first seller to offer them, bol.com has no product information available. This means you’ll be responsible for providing all necessary content (title, description, images, attributes, etc.), which bol.com will then review and approve before the product can go live.
New EAN Codes Required
To publish unique products, you must have new and valid EAN codes. Because the product doesn’t exist yet on bol.com, a proper EAN (European Article Number) is required for bol.com to create the product listing.
Where Can You Get EAN Codes?
EAN codes are not automatically generated by bol.com or the plugin—you need to purchase them yourself from a legitimate source.
The most recognized provider is GS1, but there are several other reputable platforms where you can buy valid EANs online.
Important Things to Keep in Mind
- Always make sure your EAN codes are valid, unused, and correctly assigned to the right products.
- Bol.com will not approve listings with invalid or reused EANs.
- Each product variation (size, color, material, etc.) must have its own unique EAN code.
If you don’t yet have EAN codes for your products, we recommend obtaining them before attempting to upload unique products to bol.com.
1 Enable product content
Before you can start uploading unique products, you’ll need to activate product content support in the plugin settings.
- Open the plugin settings.
- Navigate to the Product Content tab.
- Enable Upload new products.
- Select your preferred content language (Dutch or French).
- Choose how often the datamodel file with product classifications should be fetched from bol.com (Weekly or Monthly).
- Click Save Changes to apply the settings.

2 Category mapping
Once product content is enabled, the next step is to set up your category mapping. This is where you link your WooCommerce categories to the appropriate bol.com categories.
- Open the plugin settings.
- Go to the Category Mapping tab.
- On the left, select the bol.com category you want to use (you can also search for it using the search bar).
- On the right, select the WooCommerce category you want to map to that bol.com category.
- Click Connect to save the mapping.

3 Configure category
After connecting your categories, the next step is to configure them. This is where you set up the Mandatory fields in WooCommerce, defining where the plugin should pull product information and content from.
By configuring your categories in advance, you won’t need to manually set up product content later. Any product assigned to a connected and configured WooCommerce category will automatically inherit the mapped content.
Important: all fields must be configured or else Bol will refuse your product.
- On the right side of the connected category, click Configure category fields.
- A pop-up window will appear showing the Mandatory fields.
- Configure all the Mandatory fields to enable product publishing.
- You can map fields to:
- Product attributes (see 4 Create Product Attributes below)
- Product custom fields (see 5 Create Custom Fields below)
- Product title (only for the title field)
- Product description (only for the description field)
- Once everything is mapped to your liking, scroll down and click Save Configuration.

4 Create Product Attributes
Some bol.com fields provide a small set of default values to choose from. However, most fields must be populated using either a Product Attribute or a Custom Field. In this section, we’ll show you how to create Product Attributes within the WooCommerce product settings.
4.1 Create a Product Attribute
- In your WordPress dashboard, go to Products → Attributes.
- On the left, enter a name for your new attribute (for example: Color).
- You can leave the Slug field empty—WooCommerce will generate it automatically.
- Click Add attribute.

4.2 Configure the Attribute Terms
After creating the attribute, you’ll need to add its selectable values (terms). For example, for the attribute Color, you might add values like Black, White, Beige, or Grey.
- On the same Products → Attributes page, find your new attribute on the right and click Configure terms.
- You’ll be taken to a new page where you can add the attribute values.
- On the left, enter the term name (e.g., Black).
- Again, you may leave the Slug field empty.
- Click Add new Color (or whatever your attribute is named).

4.3 Map the Attribute
Now that you have created the attribute and its terms, you need to tell the plugin to use this information for bol.com.
- Navigate back to the plugin settings > Category Mapping.
- Click on Configure category fields next to your mapped category.
- Find the relevant bol.com field (e.g. Color).
- Select Product Attribute from the dropdown menu.
- In the input field next to it, type the Name of the attribute exactly as you created it in step 4.1 (e.g.
Color). - Click Save Configuration.
5 Create Custom Fields with Secure Custom Fields plugin
Some bol.com fields provide a small set of default values to choose from. However, most fields must be populated using either a Product Attribute or a Custom Field. In this section, we’ll show you how to create Custom Field within the WooCommerce product settings.
Secure Custom Fields transforms WordPress from a standard blogging platform into a fully flexible Content Management System (CMS).
- Add Extra Data: It allows you to add specific data fields (like text, images, date pickers, or file uploads) to your WooCommerce Products, Orders, Users, or any other WordPress post type.
- Structure Your Content: Instead of dumping everything into the main description box, you can separate data (e.g., "Material," "Brand," "Release Date") for better organization.
Tip: You can download the plugin from the WordPress repository by searching for: Secure Custom Fields.
Here is a clear, step-by-step guide to adding a text field to your WooCommerce products. In this example, we'll create a Material field.
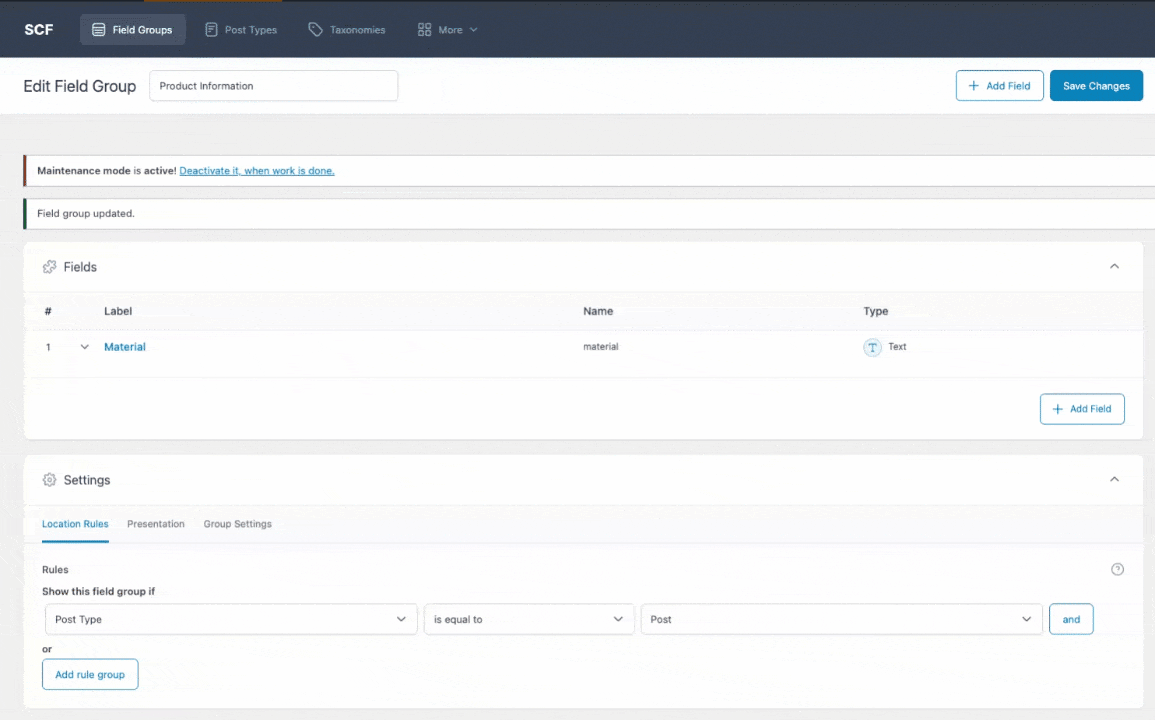
5.1 Create a Field Group
- Go to your WordPress Dashboard.
- Navigate to SCF (or Custom Fields) > Field Groups.
- Click Add New.
- Give the group a title, for example: Product Information.

5.2 Add the "Material" Field
- Click the + Add Field button.
- Field Label: Enter
Material. - Field Name: This will auto-fill (usually
material). This is the "key" you use to retrieve the data later. - Field Type: Select Text (or "Text Area" if you need more space).

5.3 Set Location Rules (Where to show it)
- Scroll down to the Settings section (often labeled "Location Rules").
- Set the rule to: Show this field group if
Post Typeis equal toProduct. - Lastly, click the Save Changes (or Publish) button at the top right.
5.4 Enter Data in a Product
- Go to Products > All Products and edit any product.
- Scroll down (usually below the main product editor and Product Data box).
- You will see your new Product Information section.
- Type the material (e.g., "100% Cotton") into the Material field.
- Update the product.

5.4 Map the Custom Field
Now that you've created the field, you need to link it to Bol.com.
- Go back to the Woosa Bol.com plugin settings.
- Open the Category Mapping tab.
- Click on Configure category fields next to your mapped category.
- In the pop-up, find the relevant Bol.com field (e.g. Materiaal).
- Select Product Custom Field from the dropdown menu.
- In the input field next to it, type exactly the Field Name you created in step 5.2 (e.g.,
material).

6 Publishing unique products
Once your categories are connected and configured, you’re ready to publish your unique products to bol.com.
Steps to Upload Content:
- In the WooCommerce product page, select "Bulk Action: Upload Content" and click on "Apply".
- The status will show "Processing" for a while, but eventually, Published will appear (this is expected).
- If it results in an error, please continue to follow these steps underneath.
- Open the product editing page and scroll down to Product Data.
- Click on the Bol.com tab and select "Manage Content".
- A pop-up screen will appear, allowing you to review the Mandatory fields you configured earlier.
- If everything looks good, scroll down and click "Save Content" to finalize the process.

Can't figure it out? You can always send a message to the support team via the chat bubble at the bottom right 🎈 Support to the rescue 👨💻 👩💻